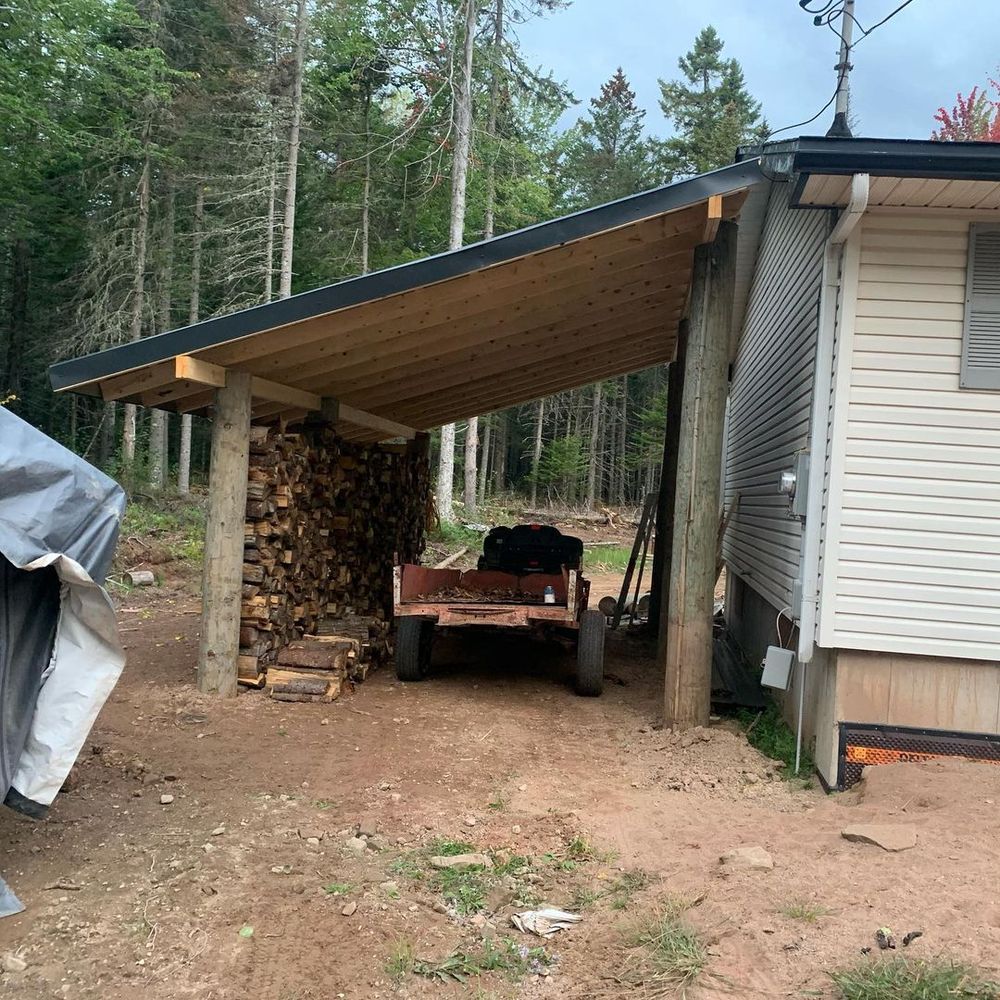
How to Build a Lean-To Shed DIY: A Step-by-Step Guide for Beginners
Hey there, fellow DIY enthusiasts! So, you're dreaming of a lean-to shed â€" that handy little extra storage space attached to your house or another structure. Fantastic! Building one yourself is totally doable, even if you’re a beginner. I'm going to walk you through the process, step by step, in a way that's easy to understand and follow. Grab your tools, let's get started!
Planning and Preparation: The Foundation of a Great Shed
Before you even think about hammering a nail, you need a solid plan. This isn't rocket science, but a little prep work will save you headaches later.
1. Choosing Your Location and Size:
Think about where you want your lean-to. It needs to be attached to a sturdy structure â€" a house, garage, or even a strong fence. Consider access â€" you want it to be easy to get to your shed. Measure the available space carefully and decide on the dimensions of your shed. Remember, bigger isn't always better, especially for a beginner. Start small and you'll be less likely to get overwhelmed.
2. Gathering Your Materials:
This is where a detailed materials list comes in handy. You’ll need:
- Pressure-treated lumber for the foundation and frame (choose the right dimensions based on your shed size and local building codes).
- Plywood or OSB (Oriented Strand Board) for the walls and roof.
- Roofing material (shingles, metal, etc.).
- Nails and screws (various sizes).
- Post anchors or concrete.
- Weather stripping.
- Measuring tape, level, saw (circular saw is helpful but a hand saw works too!), hammer, drill, safety glasses, work gloves.
- Optional: Paint or stain for the exterior.
It's crucial to check your local building codes before purchasing materials. They may have specific requirements regarding materials, size, and even the type of foundation you need.
3. Getting the Necessary Permits:
Depending on your location and the size of your lean-to, you might need a building permit. It’s always better to be safe than sorry! Contact your local building department to find out what’s required. This might seem like a tedious step, but it can prevent future problems down the line.
Building the Foundation: A Solid Start
A sturdy foundation is key to a long-lasting shed. There are a couple of approaches you can take:
1. Concrete Foundation:
This is the most robust option but requires more work. You'll need to dig trenches, pour concrete, and let it cure properly. This adds extra time to the project but ensures a rock-solid base.
2. Pressure-Treated Lumber Foundation:
A simpler and quicker method, particularly for smaller sheds. This involves using pressure-treated 4x4 posts or even 2x6s set in the ground, anchored with post anchors or concrete. This option is less labor intensive but might require more frequent maintenance over time.
Framing the Structure: Building the Bones of Your Shed
With your foundation in place, it’s time to build the frame. This is where your measurements and planning truly pay off.
1. Building the Walls:
Cut your lumber according to your plan. Assemble the wall frames, using appropriate nails or screws to create sturdy, square structures. Make sure to use a level to ensure everything is plumb (perfectly vertical) and square.
2. Attaching the Walls to the Foundation:
Carefully attach your wall frames to the foundation using appropriate fasteners. Ensure they are securely attached and level.
3. Constructing the Roof Frame:
This part depends on the style of roof you've chosen. For a simple lean-to, you'll typically build a series of rafters that slope from the higher point of attachment to the lower point (the ground, generally). Ensure proper spacing and secure fastening. You can use a speed square to ensure proper angles.
Sheathing and Roofing: Protecting Your Investment
Now for the finishing touches that will protect your shed from the elements.
1. Sheathing the Walls and Roof:
Attach the plywood or OSB sheathing to the walls and roof frame using appropriate nails. Make sure to keep the sheathing flush and aligned for a clean finish.
2. Installing the Roofing Material:
This is where you'll install your chosen roofing materialâ€"shingles, metal, or even tar paper. Follow the manufacturer’s instructions carefully. Properly flashing around any penetrations (like vents) is essential to prevent leaks.
Finishing Touches and Additional Features
Once the main structure is complete, add those finishing touches to make your shed truly your own.
1. Adding a Door:
Install a door, ensuring it's properly framed and sealed. Consider using weather stripping for better protection from the elements.
2. Painting or Staining:
A coat of paint or stain will protect the wood and enhance the appearance of your shed. Choose a weather-resistant option.
3. Adding Shelves or Other Features:
Customize your shed with shelves, hooks, or other features to maximize storage space and functionality.
Commonly Asked Questions
Q: How long does it take to build a lean-to shed?
A: This varies greatly depending on the size and complexity, your experience level, and the weather. A small, simple lean-to could take a weekend, while a larger, more complex one could take several.
Q: How much does it cost to build a lean-to shed?
A: The cost depends heavily on the size, materials, and your location. You can expect to spend anywhere from a few hundred to several thousand dollars.
Q: Do I need any special tools?
A: A circular saw will make things much easier, but a hand saw will work. You’ll definitely need a hammer, drill, measuring tape, level, and safety glasses.
Q: What about building codes?
A: Always check with your local building department. They’ll have specific requirements for your area.
Q: What if I encounter problems?
A: Don't panic! There are tons of online resources and YouTube tutorials. Ask for help from experienced DIYers if needed.
There you have it! Building your own lean-to shed is a rewarding project. Take your time, plan carefully, and enjoy the process. You’ll have a fantastic new storage space in no time!
Sign up here with your email
ConversionConversion EmoticonEmoticon
Note: only a member of this blog may post a comment.