Build a Sturdy 8x12 Lean-To Shed: Your Easy DIY Guide
Hey there, fellow DIY enthusiasts! So you're thinking about building your own lean-to shed? Fantastic! It's a super rewarding project, and an 8x12 lean-to is the perfect size for a lot of uses â€" storing garden tools, bikes, firewood… you name it! This guide will walk you through the process step-by-step, in a way that even a beginner can understand. Let's get started!Planning and Preparation: The Foundation of a Great Shed
Before you even think about grabbing a hammer, you need a plan. This isn’t about intricate blueprints; it’s about making sure you have everything you need and know what you’re doing.Choosing Your Location
First things first: where will your magnificent shed reside? Consider proximity to a power source (if needed), accessibility, and drainage. You want a level spot that won’t flood during heavy rain. Check local building codes, too â€" some areas have regulations about shed placement.
Gathering Your Materials
This is where a detailed list comes in handy. You’ll need lumber (pressure-treated for the base, regular for the framing and siding), roofing materials (asphalt shingles are easy to work with), screws, nails, a post hole digger (or a friend with one!), concrete (for your posts), and various tools (more on that later).
Here's a rough estimate of materials, keep in mind these quantities might need adjusting based on your specific design and local lumber prices:
- Pressure-treated 4x4 posts: 6
- Pressure-treated 2x6 lumber for the base: Approximately 20 linear feet
- 2x4 lumber for framing: At least 100 linear feet
- Plywood or OSB for sheathing: Enough to cover the walls and roof
- Roofing material (e.g., asphalt shingles): Enough to cover the roof area
- Exterior siding (optional): Your choice of material and quantity
- Screws (various sizes)
- Nails (various sizes)
- Concrete mix
Always buy a little extra â€" it’s better to have leftovers than to run short mid-project!
Essential Tools
You'll need a decent collection of tools to get this job done efficiently and safely. Here's a list of essentials:
- Measuring tape
- Level
- Shovel
- Post hole digger
- Hammer
- Drill with various bits (including a drill bit for pilot holes)
- Circular saw or hand saw
- Safety glasses
- Work gloves
Having a power drill will significantly speed things up, but it's possible to do it all with hand tools, just be prepared for more elbow grease!
Building the Foundation: A Solid Start
Your shed's stability starts with its foundation. A simple concrete pier foundation is perfect for a lean-to.
Digging the Holes
Dig six holes, two in the back and four in the front, about 2-3 feet deep, depending on your local frost line (check your building codes!). Space the holes approximately 4 feet apart.
Setting the Posts
Set your 4x4 pressure-treated posts in the holes, ensuring they are plumb (perfectly vertical) using your level. Fill the holes with concrete mix, allowing it to fully set (usually 24-48 hours).
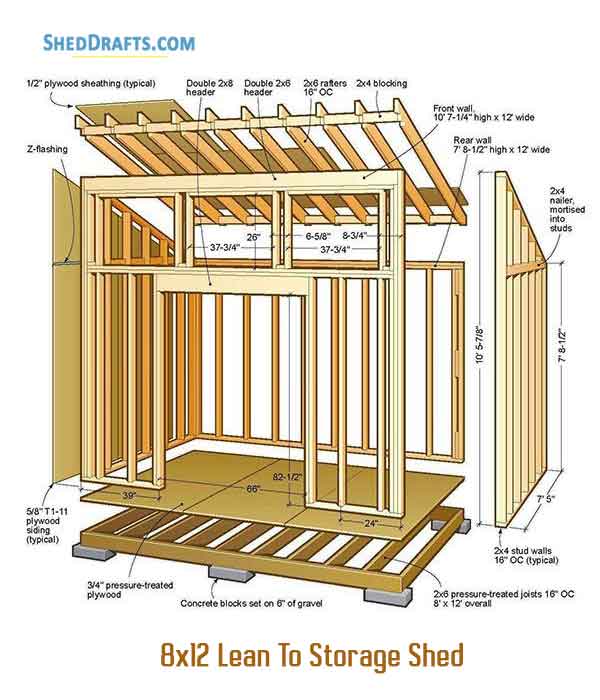
Framing the Structure: The Shed's Skeleton
Once your foundation is solid, it’s time to build the frame. This will be the supporting structure for your walls and roof.
Building the Base Frame
Attach your 2x6 pressure-treated base frame to the top of your concrete posts, creating a rectangular base for your shed. Use strong screws and ensure it's perfectly level.
Constructing the Walls
Frame the walls using 2x4s, creating a basic rectangular structure. Remember to leave openings for a door and any windows you might want to include. Securely attach the wall frames to the base frame.
Building the Roof Frame
The roof frame for a lean-to is simpler than a gable roof. You'll create rafters that slope down from the higher point (your existing structure) to the back wall of your shed. Calculate the rafter lengths accurately to ensure proper slope and overhang.
Sheathing and Roofing: Protecting Your Investment
Now comes the part where your shed starts to take shape!
Applying the Sheathing
Attach plywood or OSB sheathing to the walls and roof frame. This provides a solid base for your siding and roofing materials. Use appropriate nails or screws and ensure the sheathing is flush and aligned.
Installing the Roofing Material
This is where you'll lay down your asphalt shingles (or your chosen roofing material). Start at the bottom and work your way up, overlapping each shingle to ensure watertight coverage. Follow the manufacturer's instructions for best results.
Finishing Touches and Refinements
With the main structure complete, it’s time to add those finishing touches.
Adding Siding (Optional)
If you’re going for a more finished look, install your chosen siding. This protects the sheathing and adds to the aesthetic appeal of your shed.
Installing Doors and Windows (If Applicable)
Install any doors and windows, ensuring they are properly sealed and weatherproofed.
Adding Finishing Touches
Consider adding trim, painting the exterior, or installing shelving inside to personalize your new shed. This is the fun part where you can let your creativity shine!
Commonly Asked Questions
Q: How long does it take to build an 8x12 lean-to shed?
A: The timeframe varies depending on your experience and the pace you work at. A weekend warrior might take a couple of weekends, while someone more experienced could potentially do it in a long weekend. Allow ample time, especially for concrete curing.
Q: How much does it cost to build an 8x12 lean-to shed?
A: The cost depends heavily on the materials you choose. You could build a basic shed for a few hundred dollars if you use readily available and less expensive materials, while a more sophisticated shed with high-end materials could cost well over a thousand.
Q: Do I need a building permit?
A: Check with your local building department. Permit requirements vary by location, and often depend on the size and complexity of your structure.
Q: Can I build this shed by myself?
A: While it's possible to build it solo, having a helping hand (especially for lifting heavier pieces) can make the process significantly easier and safer. Consider asking a friend or family member to assist.
Q: What type of wood should I use?
A: Pressure-treated lumber for the base and posts is essential for ground contact to prevent rot. For the framing and other parts of the structure, standard lumber will do the job.
And there you have it! Your comprehensive guide to building an 8x12 lean-to shed. Remember to always prioritize safety, take your time, and enjoy the process. Happy building!
Sign up here with your email
ConversionConversion EmoticonEmoticon
Note: only a member of this blog may post a comment.